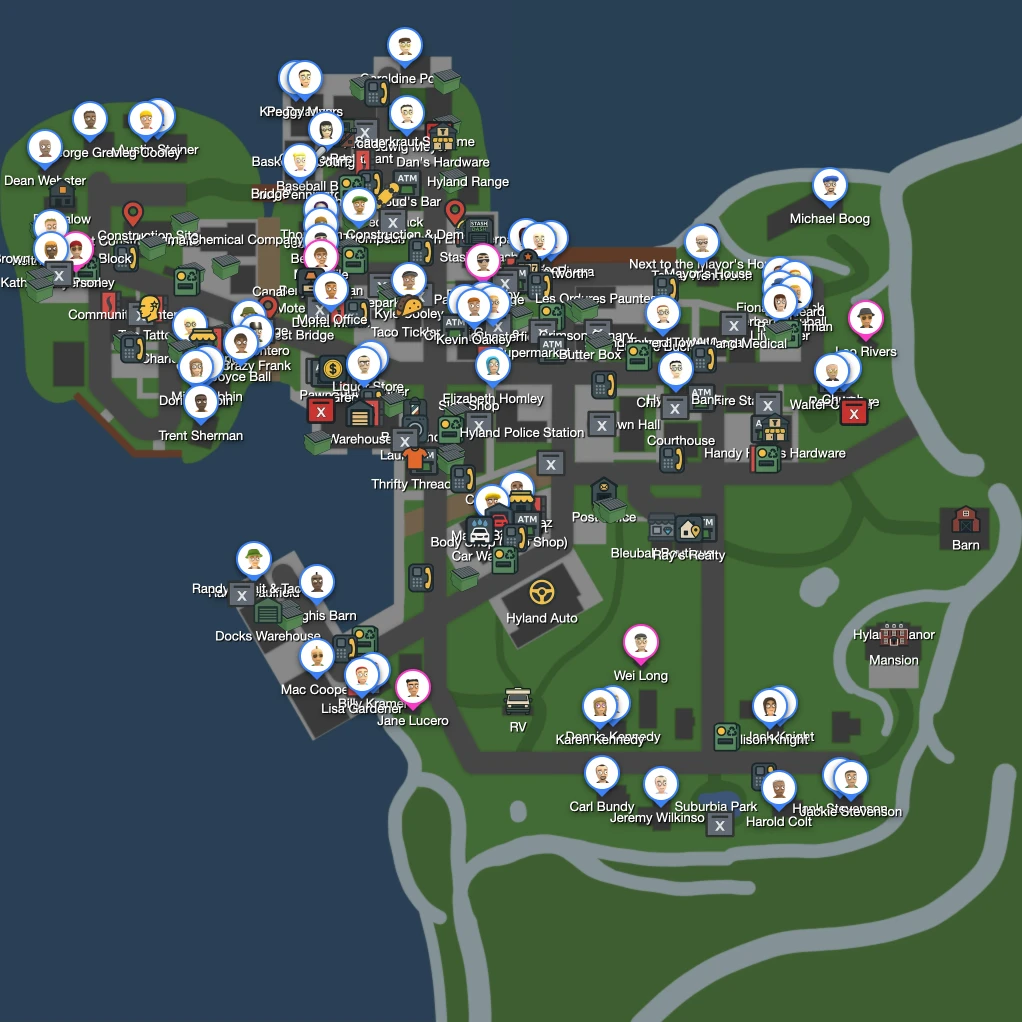
Schedule 1 Interactive Map: Uncover Every Key Locations in Hyland Point
Let's exploring the Schedule 1 map, identifying every important location from Northtown, Westville, Downtown, Docks, Suburbia and Uptown in Hyland Point map. Knowing the layout of each district on the Schedule 1 map is crucial for your success.
We'll show you how to use our interactive map to navigate the Schedule 1 world. Then, we'll catalog the must-know Schedule 1 locations – the properties you can buy, the shops you'll need, and the Customers, Dealers and Suppliers. After that, we'll explore each region of Hyland Point map, detailing its unique locations and things you must know. Do you have questions about a specific Schedule 1 location or objective? Our "how-to" section has you covered. When you finish this guide, the Schedule 1 map will feel like the back of your hand, and every critical Schedule 1 location will be etched in your mind.
Why Our Interactive Map is Your Best Friend in Schedule 1
Let's be real; Hyland Point is a complex beast. The in-game Schedule 1 map can sometimes be limited or confusing when finding a specific, out-of-the-way Schedule 1 location. That's where our interactive map come in – It will be incredibly valuable for navigating the intricate Schedule 1 world.
The Key Features of our Schedule 1 Interative Map
Our Schedule 1 map packed with features designed to make your life easier. Knowing how to use them effectively is key.
- Filtering Capabilities: This is your bread and butter. Our map offer ways to filter what you see. Want to see only "Schedule 1 dealer locations"? Or maybe just every "Schedule 1 shop location" that sells tools? With a couple of clicks, you can instantly declutter your Schedule 1 map view, letting you focus on exactly what you need to find. This is crucial for efficiently navigating the dense Schedule 1 map.
- Search Functionality: Got a specific Schedule 1 location in mind, like "where to find Benji Coleman in Schedule 1"? Click on the search bar. Type in the name, and boom – you're guided right to it. This saves an incredible amount of time compared to manually scanning the entire Schedule 1 map.
Using Interactive Map to Dominate Hyland Point in Schedule 1 Game
All right, you know about the map and its features. Now, let's discuss the strategy for using these tools to master the Schedule 1 map.
- Efficient Route Planning: Don't just wander! Use the Schedule 1 interactive map to plan the most efficient routes. Do you have multiple deliveries or objectives? Plot a course that hits all necessary Schedule 1 locations with minimal backtracking. Think like a logistics expert – time is money, especially in Hyland Point.
- Locating Specific Items & NPCs: Need a particular upgrade from a "Schedule 1 shop location" or have to find a specific NPC for a quest? Use those map filters! Instantly highlight all potential Schedule 1 locations and save yourself a headache—no more guessing which Gas Mart sells that crucial ingredient.
Curated List of Most Important Locations in Schedule 1
Now that you're a pro at viewing and navigating the Schedule 1 with interactive map, let's zoom in on what you should look for. From empire-building properties to essential shops and shadowy contacts, every critical Schedule 1 location in the map is covered.
Purchasable Properties & Businesses in Schedule 1 Map
In Schedule 1, each property location you acquire offers unique strategic advantages, from production capacity to money laundering capabilities. Making smart investments in these fixed assets on the Schedule 1 map is crucial for expanding your operations. These properties' progression in cost and benefits often mirrors your own journey through the game – starting small and scaling up as your influence and capital grow.
Key Table: Purchasable Properties & Businesses in Schedule 1 Map
This table is your go-to for comparing these vital investments. Understanding the cost, benefits, and strategic placement of each Schedule 1 location on the Schedule 1 map will help you make informed decisions. For example, the Docks Warehouse offers immense space, but its remote Schedule 1 location presents logistical challenges that must be considered.
| Name | Type | Cost | Schedule 1 Location (Region & Specifics) | Key Benefits |
|---|---|---|---|---|
| The Motel | Property | $75 | Northtown (Tutorial) | Basic shelter, 0 Employee/Vehicle Slots |
| The Sweatshop | Property | $800 | Northtown (Above Fat Dragon Chinese Restaurant) | Early production space, 1 Employee Slot |
| The Bungalow | Property | $6,000 | Suburb (near the motel) | Starter base, 1 Loading Dock, 5 Employee Slots |
| The Barn | Property | $25,000 | Rural part of the map (outside the city) | Growth potential, 2 Loading Docks, 10 Employee Slots |
| The Docks Warehouse | Property | $50,000 | Industrial zone / Docks | Pinnacle property, massive space, 2 Loading Docks, 10 Employee Slots |
| Laundromat | Business | $4,000 | Near the warehouse and Slop Shop | Max Laundering: $2,000/24 h |
| The Post Office | Business | $10,000 | Southern Northtown (behind the courthouse) | Max Laundering: $4,000/24 h |
| The Car Wash | Business | $20,000 | Next to Ray's Realty | Max Laundering: $6,000/24 h |
| Taco Ticklers | Business | $50,000 | Near the skate park | Max Laundering: $8,000/24 h |
Essential Shops & Services in Schedule 1 Map
You can't run an empire on ambition alone; you need supplies, tools, and services. Knowing where to find these essential Schedule 1 shop locations on the Schedule 1 map is fundamental. Some shops even have specific operating hours or only accept certain payment types, so keep an eye on those details.
Key Table: Essential Shops & Services on the Schedule 1 Map
| Shop Name | Type | Purpose/Items Sold | Schedule 1 Location (Region & Specifics) | Operating Hours | Payment Type |
|---|---|---|---|---|---|
| Dan's Hardware | Hardware Store | Furniture, Storage, Packaging, Agriculture, Tools | Northtown | 6am - 8pm | Credit Card |
| Gas Mart | Convenience Store/Gas | Ingredients, Packaging, Tools | Multiple (e.g., Northtown) | 24/7 | Credit Card |
| Handy Hank's Hardware | Hardware Store | Furniture, Storage, Packaging, Agriculture, Tools | 6am - 8pm | Credit Card | |
| Pawn Shop | Pawn Shop | Sell unwanted inventory (legal items) | Central Hyland Point | 6am - 6pm | Cash |
| Ray's Realty | Real Estate Agency | Purchase properties or businesses | (e.g., near Car Wash) | 6am - 6pm | Credit Card |
| Auto Shop (Body Shop) | Vehicle Services | Change vehicle colors; Respawn stuck vehicles | (e.g., near Gas Mart) | 6am - 6pm | Credit Card |
| Hyland Auto | Car Dealership | Purchase vehicles | 6am - 6pm | Credit Card | |
| Thrifty Threads | Clothing Store | Purchase various cosmetics | 6am - 6pm | Credit Card | |
| Bleuball's Boutique | Specialty Goods | Signs, Safes, Lamps, Jewelry, Golden Toilet, etc. | 6am - 6pm | Credit Card | |
| Shred Shack | Skateboard Shop | Purchase rideable skateboards | Northtown | 6am - 6pm | Cash |
| Barbershop | Barber | Change hairstyle and hair color | (e.g., near Laundromat) | 6am - 6pm | Credit Card |
| Top Tattoo | Tattoo Parlor | Purchase tattoos for your character | 6am - 6pm | Credit Card | |
| Warehouse (Oscar's Store) | Special Vendor/Services | Hire Employees; Buy Weapons; Oscar's Store (Furniture, Ingredients) | (Unlocks at Hoodlum V) | 6pm - 6am | Cash |
The Key NPCs You Need to Know in Schedule 1 Map
In Hyland Point, it's not just what you know but who you know. Tracking down key NPCs – your Dealers and Suppliers – is vital for progression. These individuals are often tied to specific regions of the Schedule 1 map and may require you to reach a certain rank or fulfill other conditions before they work with you. Understanding this interconnectedness between map exploration, rank progression, and NPC availability is key to efficiently expanding your network.
Key Table: Strategic Dealers & Suppliers on the Schedule 1 Map
| NPC Name | Role | Region | Specific Schedule 1 Location | Rank/Unlock Condition | Signing Fee | Specialty/Stash Schedule 1 Location |
|---|---|---|---|---|---|---|
| Benji Coleman | Dealer | Northtown | Motel Room 2 | No rank requirement / Main quest | $500 (cash) | Connects to Chloe Bowers, Beth Penn |
| Molly Presley | Dealer | Westville | Brown Apartment Block Room 1 | Hoodlum I | $100 (cash) | Connects to George Greene, Charles Rowland, Jerry Montero |
| Brad Crosby | Dealer | Downtown | Parking Garage (in a tent) | Hustler I | $2 000 (cash) | Connects to Randy Caulfield, Greg Figgle, Eugene Buckley |
| Jane Lucero | Dealer | Docks | RV (west of starting RV) | Enforcer I | $3 000 (cash) | Connects to Melissa Wood, Billy Kramer |
| Wei Long | Dealer | Suburbia | Shack (behind Hyland Auto) | Block Boss I | N/A | Connects to Jackie Stevenson, Jeremy Wilkinson, Harold Colt |
| Leo Rivers | Dealer | Uptown | Shipping container (near the Church) | Baron I | N/A | Connects to Ray Hoffman, Michael Boog |
| Albert Hoover | Supplier | Northtown | Meets at various spots | Available from start | N/A | Sells marijuana seeds; Stash: Behind Dan’s Hardware |
| Shirley Watts | Supplier | Westville | Meets at various spots | Hoodlum I; Befriend Jerry Montero or Meg Cooley | N/A | Sells pseudo for meth; Stash: West wall of the Warehouse |
| Salvador Moreno | Supplier | Docks | Meets at various spots | Enforcer I; Befriend Mac Cooper or Javier Perez | N/A | Sells coca seeds for cocaine; Stash: Behind the Church |
Finding these key Schedule 1 locations and the people within them is a core part of your journey. Knowing where a supplier's stash Schedule 1 location is, for example, is critical for managing your supply chain and debts.
Finding Hidden & High-Value Spots in Schedule 1 Map
Hyland Point isn't just what you see on the surface of the Schedule 1 map. It's riddled with secrets, and knowing these hidden Schedule 1 locations can give you a significant advantage, especially regarding resources and supplies.
Dead Drops & Stashes: Your Lifeline for Supplies in Schedule 1 Map
These clandestine spots are crucial for receiving supplies from your contacts, particularly in the early game or when trying to maintain a low profile. They are often, but not always, marked with a distinctive "X." Supplier stashes are unique to each supplier and are where you'll go to pay off your debts.
Key Table: Common Dead Drop & Supplier Stash Locations in Schedule 1 Map
| Schedule 1 Location Name/General Area | Specific Description/Landmarks for Finding It |
|---|---|
| Behind Dan's Hardware (Albert's Stash) | Northtown; alley behind the store |
| Alleyway behind Grocery Store | East of Motel, next to parking garage; unmarked on map |
| Skate Park | Wall at the Skate Park |
| Behind Motel Office | Wall behind the Motel's main office building |
| Under West Bridge | Beneath the bridge connecting to Westville |
| Behind the Church (Salvador's Stash) | Docks/East side of map; behind the white church, near cemetery |
| West wall of Warehouse (Shirley's Stash) | Westville area; on the warehouse wall, may be near a green dumpster |
| North wall of the Arcade | |
| Behind Thomson Construction | |
| Taco Ticklers Wall | |
| West wall of the Pawn Shop | |
| Behind Gas Mart | |
| Behind Top Tattoo | |
| Behind Randy's Bait and Tackle | |
| Gray Docks Building | |
| Gazebo | |
| Behind the Laundromat | |
| Behind Slop Shop | |
| Behind Auto Shop | |
| Behind the Casino | |
| Behind Crimson Canary | |
| Behind Medical Practice | |
| Behind Fire Station | |
| Behind Bank | |
| Behind Fountain | |
| Central Canal | Stash near the canal, potentially behind the gas station near the fountain |
A clear list of these hidden Schedule 1 locations saves you immense time and frustration.
The Grocery Store Dead Drop & Other Sneaky Spots in Schedule 1 Map
Some of the most crucial Schedule 1 locations won't be marked on your in-game Schedule 1 map. The "Grocery Store" dead drop is a prime example; it's notorious for being difficult to find without guidance. Players often struggle with these obscure but vital spots, so clear instructions are gold. To see the dead drop in the Grocery Store, head east from the Motel. You're looking for an alleyway next to a parking garage. The dead drop slot is often on the corner of a brown brick building, sometimes near graffiti of a blue monster. Other landmarks mentioned include being past Koyama Chemical Company and Taco Ticklers, then behind an ATM in an alleyway. Always check your messages for a star icon on the Schedule 1 map, as this marks the dead drop zone, not the store itself.
Notable Easter Egg Locations in Schedule 1 Map
Many games include hidden Easter Eggs, and players are always keen to find their Schedule 1 locations. While various references and thematic Easter Eggs are mentioned in community discussions for Schedule 1 (like nods to Half-Life or Call of Duty Zombies ), specific, fixed Schedule 1 map locations for these are not always clearly detailed in the available information. For instance, a "Wheelchair on Rooftop" would count if it's a consistent, discoverable item on a specific, identifiable rooftop on the Schedule 1 map.
Specific Crafting Ingredient Locations in Schedule 1 Map
You'll often search for unique crafting ingredients like "Mega Bean (Glowing)," "Donut (Explosive)," "Wedding Fruit," or "Parenting pills." Here's what we know about finding their Schedule 1 locations:
- Mega Bean & Donut: The Mega Bean unlocks at Peddler II rank, and the standard Donut is available immediately. They become purchasable from general supply shops like Gas Marts or Hardware stores once you meet the unlock criteria, rather than being items you pick up at a fixed Schedule 1 map location.
- Explosive Donut: This is a crafted effect achieved using regular Donuts in a specific recipe, not a unique item at a distinct Schedule 1 location.
Region-Specific Exploration Guides for Hyland Point in Schedule 1 Map
Hyland Point is a sprawling and diverse Schedule 1 world, far more than a single, monolithic city. It's broken down into distinct regions, each with its character, opportunities, and challenges. You'll typically unlock regions Schedule 1 by increasing your rank and expanding your influence. Let's break down the Schedule 1 map region by region so you know exactly what to expect, where to focus your efforts, and how to find every vital Schedule 1 location within them.
Northtown: Your Starting Block in Schedule 1
Northtown is where your journey in Hyland Point begins. It's a gritty, foundational area where you'll learn the ropes.
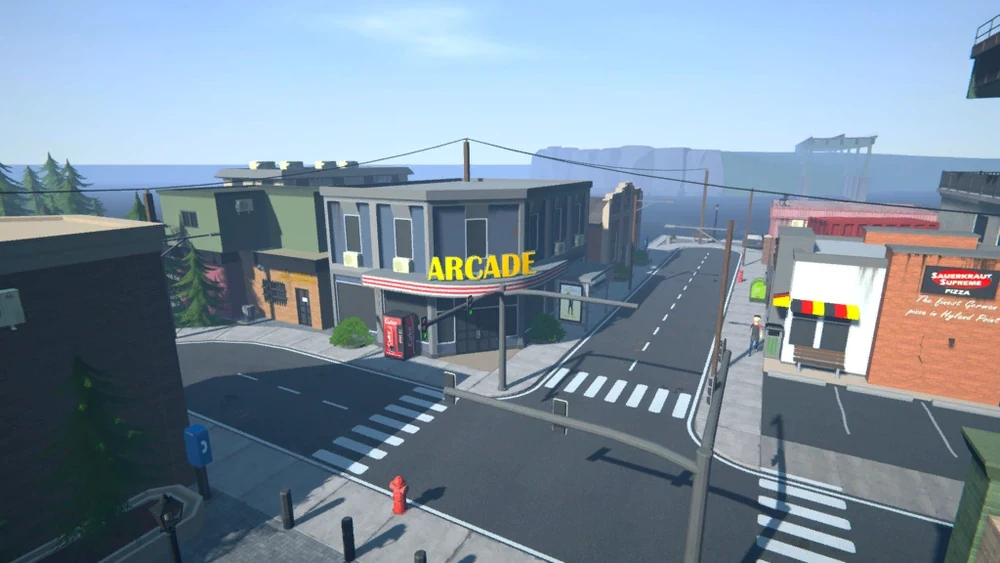
Key landmarks in Northtown include The Motel (your initial base), Dan's Hardware, the local Warehouse (later access), the Skate Park, and Sauerkraut Supreme Pizza. The Schedule 1 map will show these as key early-game hubs.
Must-See Schedule 1 Locations in Northtown
- Dealer: Benji Coleman, found in Motel Room 2. He's your first dealer and crucial for early income.
- Supplier: Albert Hoover. While he meets you in various spots, his primary stash Schedule 1 payment location is behind Dan's Hardware.
- Purchasable Properties: The Motel (initial, very cheap), The Sweatshop (above Fat Dragon Chinese Restaurant, $800). These are your first steps on the Schedule 1 property locations ladder.
- Dead Drops: Behind Dan's Hardware (Albert's Stash), North wall of the Arcade, Skate Park wall.
Navigating Northtown in Schedule 1: Tips, Challenges, & Opportunities
Northtown is relatively easy to navigate and has an extended tutorial area. It contains many essential shops for your early needs. Customers here generally have low standards, making making sales and building initial capital easier. Police presence is noticeable but less intense than in later-game areas. The main challenge is learning the game systems and establishing your first foothold. Opportunities lie in the accessible dealers and suppliers and the low barrier to entry for sales. This is the ideal region to familiarize oneself with the Schedule 1 map and its basic Schedule 1 locations.
Key Table: Northtown Schedule 1 Map Highlights
| Category | Details |
|---|---|
| Key POIs | The Motel, Dan's Hardware, Warehouse, Skate Park, Fat Dragon Chinese Restaurant |
| Notable NPCs | Benji Coleman (Dealer), Albert Hoover (Supplier) |
| Purchasable Properties | The Motel, The Sweatshop |
| Unique Dead Drops/Stashes | Albert's Stash (Behind Dan's Hardware) |
| Navigation Notes | Starter area, easy to navigate, low-standard customers, many essential shops |
Westville: Expanding Your Horizons in Schedule 1
Westville represents your first major expansion in the Schedule 1 map. It's a step from Northtown, offering new opportunities and slightly more discerning clientele.
How to Unlock Westville in Schedule 1?
- Unlock Requirement: Westville becomes available in the map once you reach the Hoodlum 1 rank by levelling up through XP earned from daily sales.
- Automatic Progression: You don’t need a side quest—advancing the main storyline and gaining levels will open Westville in the map for you.
- Map Appearance: After unlocking, Westville shows up on your in-game map as the northwest region across the river.
- Access Route: You can enter via either of the two bridges; police checkpoints only conduct checks (not block passage), especially outside curfew hours.
Key landmarks in Westville include the Gas Mart, Brown Apartments, the Bungalow property, a construction site, and possibly a park area by the water. Your Schedule 1 map will start to feel larger here.
Must-See Schedule 1 Locations in Westville
- Dealer: Molly Presley, found in the Brown Apartment block.
- Supplier: Shirley Watts. Her stash Schedule 1 location for payments is often cited as being on this district's west wall of the Warehouse.
- Purchasable Property: The Bungalow ($6,000). This is a significant upgrade and a popular choice for a first proper base among Schedule 1 property locations.
- Dead Drops: Under West Bridge, Behind Motel Office (if near the border), Shirley's Stash.
Navigating Westville: Tips, Challenges, & Opportunities
Westville still features many customers with relatively low standards, but you'll encounter some who expect better quality. The area has clandestine dealing spots like parks and construction sites. Molly Presley's Schedule 1 location near the Bungalow is strategically convenient for resupply. The West Bridge is a key access point; suppliers might meet you underneath it once you gain their loyalty. This region encourages you to think more about product quality and explore more diverse Schedule 1 locations on the Schedule 1 map.
Key Table: Westville Schedule 1 Map Highlights
| Category | Details |
|---|---|
| Key POIs | Gas Mart, Brown Apartments, The Bungalow, Construction Site, Lakeside Park |
| Notable NPCs | Molly Presley (Dealer), Shirley Watts (Supplier) |
| Purchasable Properties | The Bungalow |
| Unique Dead Drops/Stashes | Shirley's Stash (West wall of Warehouse), Under West Bridge |
| Navigation Notes | Residential feel, slightly higher customer standards, convenient NPC/property proximity |
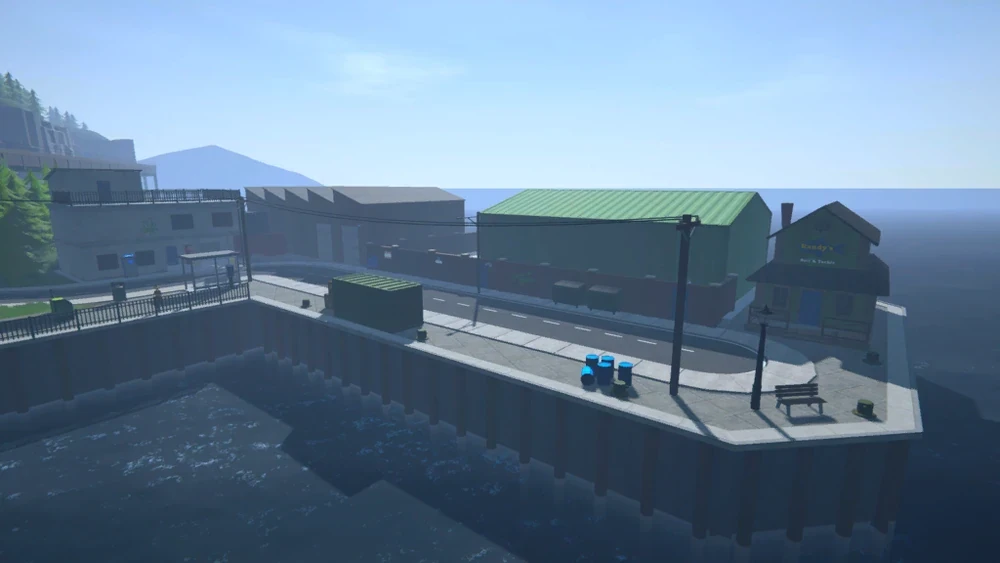
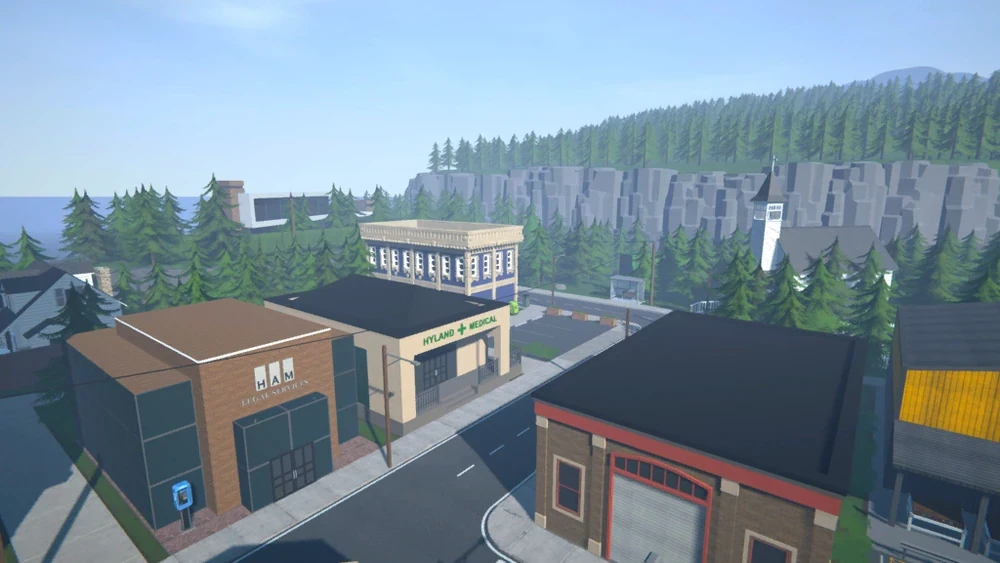
Docks: The Industrial Frontier in Schedule 1
The Docks is a rough, industrial part of the Schedule 1 map, offering significant operational advantages and unique hazards.
How to Unlock Docks in Schedule 1?
- Reach Enforcer I Rank: Earn enough XP from sales and operations to hit the Enforcer I milestone.
- Region Unlock: At Enforcer I, the Docks region becomes selectable in your smartphone’s Contacts app.
- Locate Ray’s Realty: After unlocking, head past Hyland Auto, take a right, then a left at the Post Office to find Ray’s Realty.
- Purchase Cost: Buy the Docks property for $50 000 to gain full access.
Key locations in Docks include The Docks Warehouse, Randy's Bait & Tackle, and various other industrial buildings and piers.
Must-See Schedule 1 Locations in Docks
- Dealer: Jane Lucero, often found in an RV in this area.
- Supplier: Salvador Moreno. His stash Schedule 1 payment location is behind the Church (which might be on the eastern edge of the map, potentially bordering or accessible from the Docks).
- Purchasable Property: The Docks Warehouse ($50,000). This massive, high-tier Schedule 1 property location is excellent for large-scale production.
- Dead Drops: Gray Docks Building, Behind the Church (Salvador's Stash).
Navigating the Docks in Schedule 1: Tips, Challenges & Opportunities
The Docks can be challenging. It's often described as isolated with limited entry and exit points, and police checkpoints can be frequent on the main access roads. The pier area can be a dead end. However, the Docks Warehouse is a prime asset, offering vast space. Customers here typically have moderate standards. Proximity to the central Warehouse (where Oscar and other vendors are) is a big plus, but its distance from the city center means you'll need good transportation and logistics. Transporting materials like cocoa leaves from The Barn to The Docks Warehouse can be tedious but allows for massive production. This region of the Schedule 1 map tests your logistical planning.
Key Table: Docks Schedule 1 Map Highlights
| Category | Details |
|---|---|
| Key POIs | The Docks Warehouse, Randy's Bait & Tackle, Industrial Buildings, Piers |
| Notable NPCs | Jane Lucero (Dealer), Salvador Moreno (Supplier) |
| Purchasable Properties | The Docks Warehouse |
| Unique Dead Drops/Stashes | Salvador's Stash (Behind the Church), Gray Docks Building |
| Navigation Notes | Isolated, police checkpoints, large property, moderate customer standards, logistical challenges |
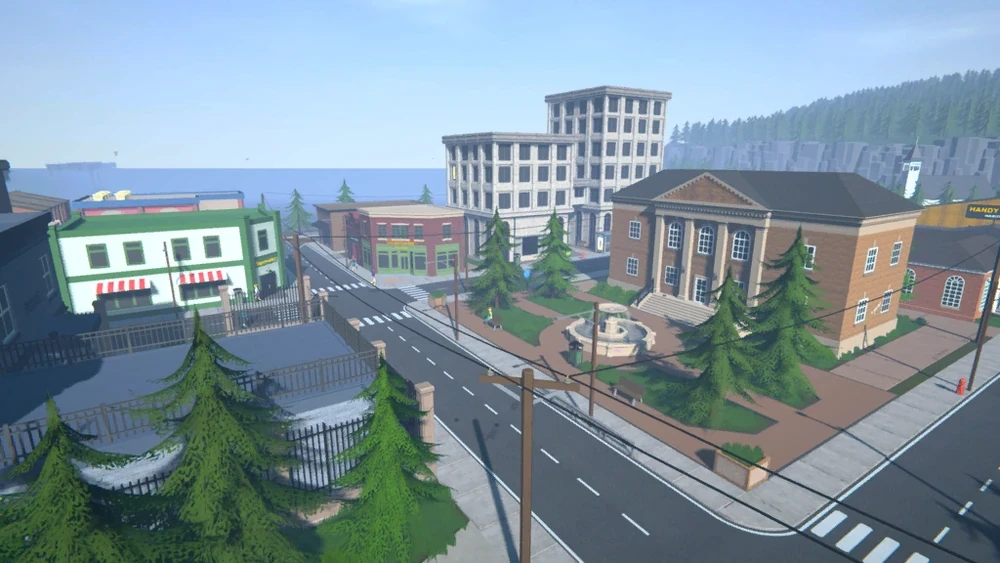
Downtown: The Urban Hustle
Downtown is the bustling commercial heart of Hyland Point, a dense urban environment with plenty of action.
How to Unlock Downtown in Schedule 1?
- Reach Hustler I Rank: Earn enough XP to attain Hustler I.
- Gain XP via Sales: You accumulate XP at the end of each day based on your sales volume and operational upgrades.
- Open Contacts App: On your smartphone in the game, go to the Contacts app to view all unlocked regions.
- Select Downtown: Once you hit Hustler I, Downtown appears in the list—tap it to unlock and fast-travel there.
Key points of interest in Downtown include the Casino, Supermarket, Car Wash, the Parking Garage (a key NPC spot), and Ray's Realty. The Schedule 1 map here is dense with activity.
Must-See Schedule 1 Locations in Downtown
- Dealer: Brad Crosby, who sets up in a tent in the Parking Garage.
- Purchasable Businesses: The Car Wash ($20,000), potentially others depending on exact boundaries. Many Schedule 1 businesses are clustered here.
- Shops: Casino, Supermarket, Hyland Bank, and various clothing and hardware stores are likely centered or accessible from Downtown.
- Dead Drops: Behind the Casino, Behind Bank, Behind Fountain.
Navigating Downtown in Schedule 1: Tips, Challenges, & Opportunities
Downtown is often easy to get around on foot or with a skateboard, which can be more convenient than a car in its sometimes congested streets. It's a prime area for shopping and accessing services. Customer standards here are typically moderate to high, meaning you'll need quality products. The Casino offers a way to make (or lose) money outside your main hustle. This area of the Schedule 1 map is a hub for both legitimate and less-legitimate commerce.
Key Table: Downtown Schedule 1 Map Highlights
| Category | Details |
|---|---|
| Key POIs | Casino, Supermarket, Car Wash, Parking Garage, Ray's Realty |
| Notable NPCs | Brad Crosby (Dealer) |
| Purchasable Properties | The Car Wash (Business) |
| Unique Dead Drops/Stashes | Behind the Casino, Behind Bank |
| Navigation Notes | Urban center, good for foot/skateboard, many shops/services, moderate-high customer standards |
Suburbia: The Affluent Outskirts in Schedule 1
Suburbia offers a glimpse into the more affluent side of Hyland Point, with nicer residences and higher expectations.

How to Unlock Suburbia in Schedule 1?
- Reach Block Boss I Rank: Earn XP through daily sales and operational upgrades until you attain the Block Boss I milestone.
- Automatic Unlock: Once you hit Block Boss I, Suburbia becomes available—no side quests or extra objectives needed.
- Open Contacts App: Open your in-game smartphone’s Contacts app to view the list of unlocked regions.
- Select Suburbia: Tap “Suburbia” in the Contacts list to unlock the area and fast-travel there.
Key landmarks in Suburbia include Ray's Real Estate (if its main office is here or primarily serves this area), Hyland Auto, and the Shack, where dealer Wei Long resides.
Must-See Schedule 1 Locations in Suburbia
- Dealer: Wei Long, located in a Shack, often described as being behind Hyland Auto.
- Purchasable Property: The Bungalow is located in the Suburbs, making this region key for early property ownership. Other upscale residential Schedule 1 property locations might become available.
- Shops: Bleuball's Boutique (avatar items) might be in or near Suburbia.
Navigating Suburbia in Schedule 1: Tips, Challenges, & Opportunities
You'll likely need a vehicle to navigate Suburbia and serve its spread-out clientele efficiently. Customers in Suburbia have high standards; they expect top-quality products. While challenging, this also means higher profit potential. Finding some customers can be tricky, but the area is relatively small. This part of the Schedule 1 map is where your product quality starts to matter.
Key Table: Suburbia Schedule 1 Map Highlights
| Category | Details |
|---|---|
| Key POIs | Residential Houses, Ray's Real Estate (vicinity), Hyland Auto, Wei Long’s Shack |
| Notable NPCs | Wei Long (Dealer) |
| Purchasable Properties | The Bungalow (borders/is in Suburbia) |
| Unique Dead Drops/Stashes | (See general stash list for Suburbia-specific locations) |
| Navigation Notes | Affluent area, vehicle recommended, high-standard customers, strong profit potential |
Uptown: The Height of Hyland Point in Schedule 1 Map
Uptown is the pinnacle of Hyland Point society – the wealthiest district with the most demanding but most lucrative clientele.
How to Unlock Uptown in Schedule 1?
- Reach Baron I Rank: Earn 2075 XP through daily sales and operations to hit Baron I.
- Open Contacts App: After ranking up, open your in-game smartphone’s Contacts app to see available regions.
- Select “Uptown”: Tap “Uptown” in the Contacts list as soon as it appears to unlock and fast-travel there.
- No Side Quests Required: Uptown unlocks automatically at Baron I—no extra missions or objectives needed.
Key locations in uptown map include the Church (near Leo Rivers' location), upscale residences, and potentially the Mayor's House if it falls within this district's boundaries.
Must-See Schedule 1 Locations in Uptown
- Dealer: Leo Rivers, often found in a shipping container near the Church.
- Potential Properties: While specific purchasable Schedule 1 property locations here aren't as detailed as The Barn or Docks Warehouse, you'd expect the most expensive real estate in the map if it becomes available. The game roadmap mentions a "gated community" with a modern purchasable home planned for the northeast, which sounds like Uptown.
Navigating Uptown in Schedule 1: Tips, Challenges & Opportunities
A car is essential for operating in Uptown. The standards here are the highest in the city; customers expect the absolute best and are willing to pay top dollar. This makes Uptown the most profitable region in the map if you can meet the demand. The clientele is complex, and you must offer powerful, high-quality products. Mastering this final frontier of the Schedule 1 map signifies actual kingpin status.
Key Table: Uptown Schedule 1 Map Highlights
| Category | Details |
|---|---|
| Key POIs | Church, Upscale Residences, Mayor's House (potentially) |
| Notable NPCs | Leo Rivers (Dealer) |
| Purchasable Properties | (Potentially high-end residences, "gated community" home planned) |
| Unique Dead Drops/Stashes | (Specific Uptown-exclusive dead drops not heavily detailed, check general list) |
| Navigation Notes | Wealthiest district, car essential, highest customer standards, highest profit potential |
Stuck? Your Map-Related "How-To" Guides for Schedule 1 Map
Let's face it: even the sharpest operators get stuck sometimes. You might be staring at your Schedule 1 map, scratching your Head, wondering, "Where is the Pawn Shop in Schedule 1?" or "How do I unlock the Docks Warehouse property?" These "how-to" guides related to the Schedule 1 map are perfect for when you need a solution, fast.
How to find the Pawn Shop in Schedule 1 Map?
You'll find the Pawn Shop between the North and Central parts of Hyland Point in the map. A good landmark is The Piss Hut – the Pawn Shop is right by it. It's also near a police checkpoint and a massive Curfew warning sign. Look for the entrance near the steps that lead down to some rather sketchy-looking warehouses along the pier. Pull up your Schedule 1 map; its icon should guide you once you're in the general vicinity. This is a key Schedule 1 location for offloading unwanted inventory for cash.
Where is the Casino in Hyland Point on the Schedule 1 map?
Head to the northern part of the starting area, Northtown, typically near the bay in the map. You can't miss the large "Casino" sign marking this Schedule 1 location. Remember its operating hours: only open from 4 PM to 5 AM in-game time. Your Schedule 1 map should feature an icon for it.
How to find the Mayor's house in Schedule 1?
This is one of those tricky, unmarked Schedule 1 locations. You need to go to the northeastern part of Hyland Point in the map. It won't appear on your standard map app within the game. Your best bet is to find the Casino (near the north shore). From the Casino, move strictly east along the road. Be cautious, as police patrols are standard in this area. You'll spot a distinctive white house at the end of that road – the Mayor's House. It's not just a landmark in the map; suppliers might arrange to meet you behind a wall to the left of the building (Next to the Mayor's House) once you've built a relationship with them.
How to unlock the Westville region in Schedule 1?
To unlock regions Schedule 1 like Westville, you must increase your rank. Specifically, Westville becomes accessible in the map once you reach Hoodlum I rank. Progression in Schedule 1 frequently ties access to new areas of the Schedule 1 map to your overall standing and accomplishments. Unlocking Westville also typically grants access to new suppliers, like Shirley Watts.
How do I unlock dealer Brad Crosby in Schedule 1?
Unlocking dealer Brad Crosby involves a couple of steps. First, you must reach the Hustler I rank, which will grant you access to the Downtown region of the Schedule 1 map. Once you can operate Downtown in the map, you must establish a friendly business relationship with one of his connected customers: Randy Caulfield, Greg Figgle, or Eugene Buckley. After these conditions are met, you can find Brad. His Schedule 1 location is in a tent within the Downtown Parking Garage.
Where is Albert Hoover's Stash located on the Schedule 1 map?
Albert Hoover's Stash is a critical early-game Schedule 1 location for managing your debt with him. You'll find it tucked away behind Dan's Hardware store in Northtown. Check the alleyway directly behind the store.
How to find Grocery Store dead drop in Schedule 1?
The Grocery Store dead drop is notoriously one of those Schedule 1 locations that aren't marked on your main Schedule 1 map, causing a lot of players to ask, "Schedule 1 Grocery Store: Exact location and how to find it?". You'll typically find this dead drop in an alleyway next to the parking garage east of the Motel. Look for the corner of a brown brick building; sometimes, distinctive blue monster graffiti is nearby. Other players have found it by navigating past Koyama Chemical Company and Taco Ticklers, then looking for an ATM – the dead drop is in an alleyway behind it. Remember to check your in-game messages for a star icon on your Schedule 1 map, which usually marks the active dead drop zone rather than the grocery store building itself.
How do I get to the Docks Warehouse property in Schedule 1?
Getting your hands on the Docks Warehouse, a prime Schedule 1 property location, requires a few steps. First, you need to unlock the Docks region of the Schedule 1 map. This happens when you achieve the Enforcer I rank. Once the area is accessible, head over to Ray's Realty. You can then purchase The Docks Warehouse for a hefty $50,000. This significant Schedule 1 location is found in the industrial zone of the Docks.
Conclusion: You've Mastered the Schedule 1 Map – What's Next?
And there you have it - With this knowledge, the intricate web of streets, businesses, and hidden spots across the Hyland Point Schedule 1 map is no longer a daunting maze but a landscape of opportunity. Every Schedule 1 location now holds potential, every alleyway a possible shortcut, and every NPC a connection to be leveraged.
If you want to be the master of mixing in Schedule 1, these four super helpful tools can't be missed (you can read this Steam Guide to learn more):
- Schedule 1 Mixing Calculator: Test your mixing first in this useful online calculation tool without costing any in the real game
- Schedule 1 Profit Reverse Calculator (Profit Maximizer): Min-max your drugs profit by finding the most valuable mixes in the game. Get any Best X Mix recipes easily with this powerful reverse calculator.
- Schedule 1 Effects Reverse Calculator (Effects Optimizer): Select your target desired effects or effects to avoid, and its powerful algorithm will find the perfect mixing recipe for you.
- Schedule 1 Best Mixing Recipes: Browse and filter through the Schedule 1 Best Mix Recipes discovered by the community.
Hyland Point is now yours to command. Go out there, apply your knowledge, and build your empire. The Schedule 1 map awaits its new master. Good luck, and may your ventures be profitable!